
Garbage Can Ghoul
Materials: (see pics at bottom for anything you may not understand) 3/4"x3/4" square plastic molding, or 3/4" x3/4" wood stock, 1" bolts w/lock nuts (if using the plastic molding) or 1 3/4" bolts w/ lock nuts (if using the 3/4"x3/4" wood stock), two 3' pieces of 2"x4"s or 2"x6"s...your choice. some small scraps of wood to strengthen areas (i used 1 1/2" deck spindles), 1 screen door closer assembly, 1 aluminum trash can, 1/2" screws, 2 medium sized cable ties, 1/4" drill bit, 1/8" diameter wire cable length (about 1 1/2' will do, 1 small metal cutting cut off wheel (i used one that attaches to my dremel tool, tape measure.
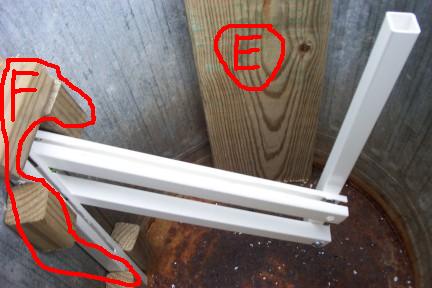
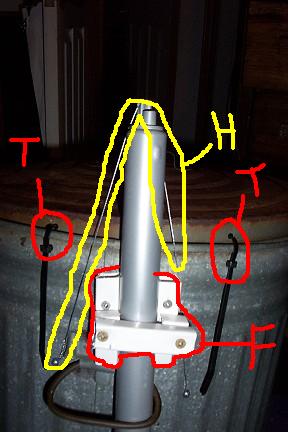
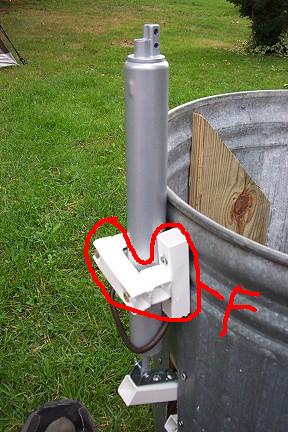
The first thing you will need to do when making the the Garbage Can Ghoul is, to make the fulcrum from your plastic molding, or your wooden stock. I will tell you how to make the fulcrum using the plastic, seeing thats what i used. if you want to use wood just adapt the wood to also operate like the pic of the plastic one below. Now measure the interior diameter of the middle of the can and then cut one piece of the plastic 1" smaller than the measurement, so that it will be sure to fit in the can. then cut another section 3" longer than the first piece. we will call these pieces A and B (A being the shorter of the two). Next measure from the bottom of the can to about 1/2 way up the can, and cut a 3rd section of plastic to that length, which we will call piece C. now drill your holes and attach sections A, B and C to one another at points C1&2 on diagram 1 below with the nuts and bolts. next stand C vertically in the bottom of the can letting A & B hang. With A & B hangin equally spaced at their lowest point measure from the end of A which is not hooked to C up wards, leaving enough room so that you can attach your head to the piece D which you will be cutting (see pic 1). now cut your 4th section (piece D) the length of the measurement you just took and attach it to section A & B at the desired spot ( pic1 D1 &2) as to give it enough clearance to move your head upwards, so that it does not hit the edge of the can. you may need to adjust it a few times, so don't be worried about having to redrill holes as you will see in pic 1 as x. Next cut out the area for the fulcrum to stick out of the back of the can, so that it can be activated by the door closer.To do this; take the cut off wheel and put it in your drill, angle grinder, dremel tool or whatever you may have for it. then cut out enough space so that the 2" piece of section B that sticks out will have enough room to fully move up and down (pic 3 as T), raising and lowering section D. once cut you may notice that your can has become sort of weak, so attach the 3' lengths of 2"x4"s (or 6"s) to the inside sides of the can as seen in pic 2, labeled E. ok it's now time to install your fulcrum. stand section C in the can and push it against the back, letting the 2" section of section B stick out the slit you cut out. secure C to the can with some screws, and then proceed to reinforce it with scraps of wood seen in pic 2 as F to hold it from moving to the side at all. and so that A/D2 does not hit right against the bottom of the can. from the outside try pushing down on B and seeing if it rises up and out of the can, if it works continue to the next step and if it doesn't then adjust D so that it will clear the can. alright lets hook up that door closer. the first thing to do will be to hook the pin assembly to the section of B that is sticking out seen in pic 3 as B1. next attach the door closer to B1 with the pin (pic 3) and stand the closer upright and secure it with left over plastic, or scraps of wood so that it can't fall over (see pic 4 and 5 as F) Lastly attach the wire cable through one of the holes in the top end of the door closer and secure it to the can with some screws(see pic 4 as H). if you do not do this when you activate the door closer to lift the fulcrum the whole door closer will go up, instead of the fulcrum. 1 last step and you're done. drill 2 holes at the top back side of the can, and 2 corresponding holes in the top, attach with the cable ties ( pic 4 as T).....and thats it! (the top will not fit quite right, this is normal, and helps to make a scary sound when the can closes after being triggered. (this prop will require about 70-90 psi depending on how heavy of an object you intend to pop out)
If you need help on rigging a compressed air trigger for this prop click on the link tbelow.
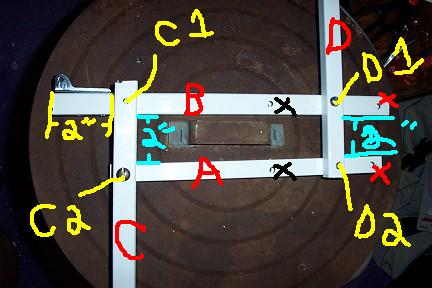

Pic 1:
Pic 4:
Pic 3:
Pic 2:
Pic 5: